Your Machine Ate a Dust Bunny and Sent You the Bill: A Seasonal Deep Clean That Actually Prevents Repairs
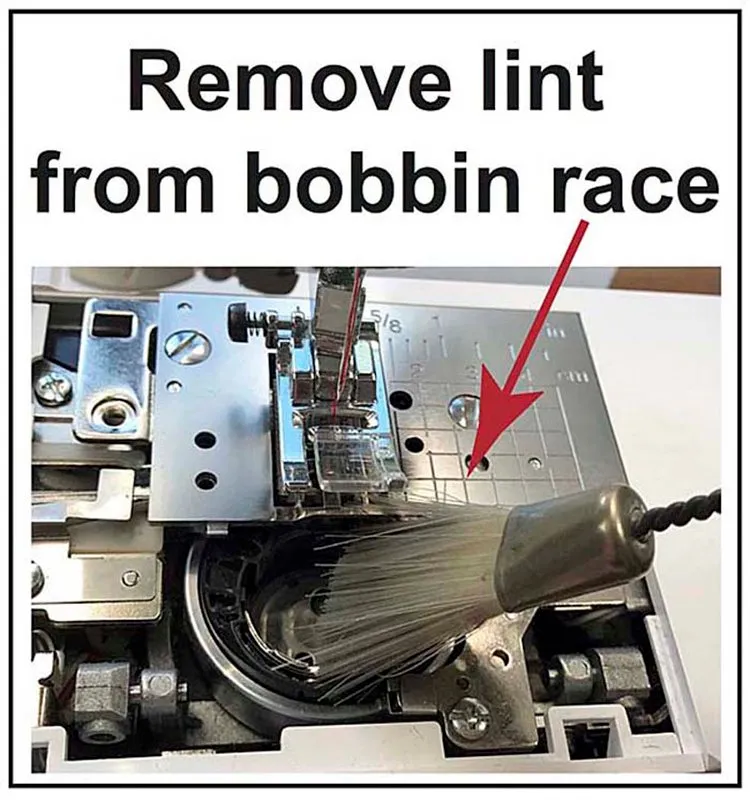
Photo: person cleaning lint from sewing machine bobbin area with brush, via threadsketchinginaction.com
The receipt was still taped to the side of Marisol's sewing cabinet when we visited her garage studio in Columbus: $412.50, parts and labor. The diagnosis? Lint packed so deep behind the bobbin housing that it jammed the hook race and bent the needle plate. A dust bunny, essentially. A very expensive dust bunny.
"I clean the bobbin area," she told us, still a little defensive. "I do! I brush it out every couple of projects."
Here's the thing — Marisol wasn't lazy. She was doing exactly what most of us do: the quick brush-out, the little blast of air, the pat on the machine's head before starting the next project. What she wasn't doing was the deeper ritual that repair techs wish every sewist would adopt. So we built one, with help from two people who see the aftermath of skipped maintenance for a living.
What the Repair Techs Actually See
Dana Whitfield has run a repair bench outside Portland for nineteen years. When we asked her the most common machine problem she fixes, she didn't hesitate: "Lint where lint shouldn't be. People think the bobbin area is the whole story. It's not. I've pulled felted lint wads out of the take-up lever area, out from under the needle plate, out of tension discs — places the manual never tells you to look."
Marcus Ibe, who services machines at a quilt shop in Georgia, put it even more bluntly: "Half my repair queue is preventable. Bent needles from lint-forced fabric drift, tension problems from compressed fuzz in the discs, feed dogs that can't grip because the teeth are clogged. If folks did a real clean four times a year, I'd be mostly fixing timing issues and broken bobbins."
Both techs said the same thing about seasonal cleaning: tie it to something you'll remember. Dana does hers at the equinoxes. Marcus suggests the change of daylight saving time — "you're already fiddling with clocks, add the machine." We like the equinox approach: March and September, spring and fall, machine gets spa day.
The Deep Clean, Step by Step
Set aside twenty unhurried minutes. You'll need a small soft-bristle brush (the one that came with your machine is fine), a new sewing machine needle, unwaxed dental floss or a strip of clean cotton fabric, tweezers, and a screwdriver if your needle plate is secured. One rule before anything else: unplug the machine. Not off — unplugged.
1. The Obvious Places, Done Thoroughly
Remove the needle, presser foot, needle plate, and bobbin case if yours comes out. Brush the bobbin area and feed dogs with short strokes, working lint toward yourself and off the machine — never deeper in. A can of compressed air is tempting, but both techs warned against it: it drives fuzz further inside. If you must blow, use a hand-held rubber blower, not your mouth (breath carries moisture) and never canned air.
2. Under the Needle Plate
This is where Marisol's trouble lived. With the plate off, check the underside channel where lint compresses into a felt-like mat, especially if you sew a lot of flannel, fleece, or minky. Tweeze out clumps, then brush the channel clean. Hold the plate up to a window light — you'll be surprised what's still hiding in the feed dog slots. A straight pin works to pick compacted fuzz out of each slot.
3. The Tension Discs
Marcus calls this "the forgotten tension problem." With the presser foot up (which opens the discs), thread a length of unwaxed dental floss through the tension path and gently saw it back and forth a few times. You'll pull out gray fuzz you didn't know was there. Do it again with a strip of cotton fabric. If your stitches have been slowly misbehaving for no clear reason, this is often why.
4. The Thread Path and Take-Up Lever
Follow your machine's entire threading route with the brush — spool pin, guides, the take-up lever slot. Dust settles here and gets pulled down into the machine with every stitch.
5. One Drop, One Needle
If your manual calls for oiling (many computerized machines don't — check first), put a single small drop of machine oil where the manual indicates, then run a scrap of fabric through to absorb excess. Finish by installing a fresh needle. Dana's rule: "A new project deserves a new needle, and a deep clean deserves one no matter what. A dull or slightly bent needle is quietly damaging your fabric and your timing."
Your Quarterly Checklist
Print this and tape it inside your cabinet door:
- Unplug machine
- Remove needle, foot, plate, bobbin case
- Brush bobbin area and feed dogs thoroughly
- Clean under and around needle plate channel
- Floss the tension discs (presser foot up)
- Brush the full thread path
- Oil only if manual instructs; run off excess on scrap
- Install fresh needle
- Wipe down exterior, clean the light lens
- Test-stitch on scrap; check tension top and bottom
What Not to Do
A few quick don'ts from the bench: don't use canned air, don't use water or household cleaners inside the machine, don't oil a machine that says not to, and don't ignore the sound. "Machines tell you things," Marcus said. "A new squeak, a rhythm change, a stitch that's suddenly ugly — that's the check-engine light. Clean it, and if it's still wrong, bring it in before you sew a whole quilt on a sick machine."
Marisol's machine is back home now, running quieter than she remembers. Her repair tech gave her the same checklist we've given you, and she's got a calendar reminder set for the fall equinox. Four hundred dollars buys a lot of fabric. Twenty minutes, four times a year, protects all of it.